
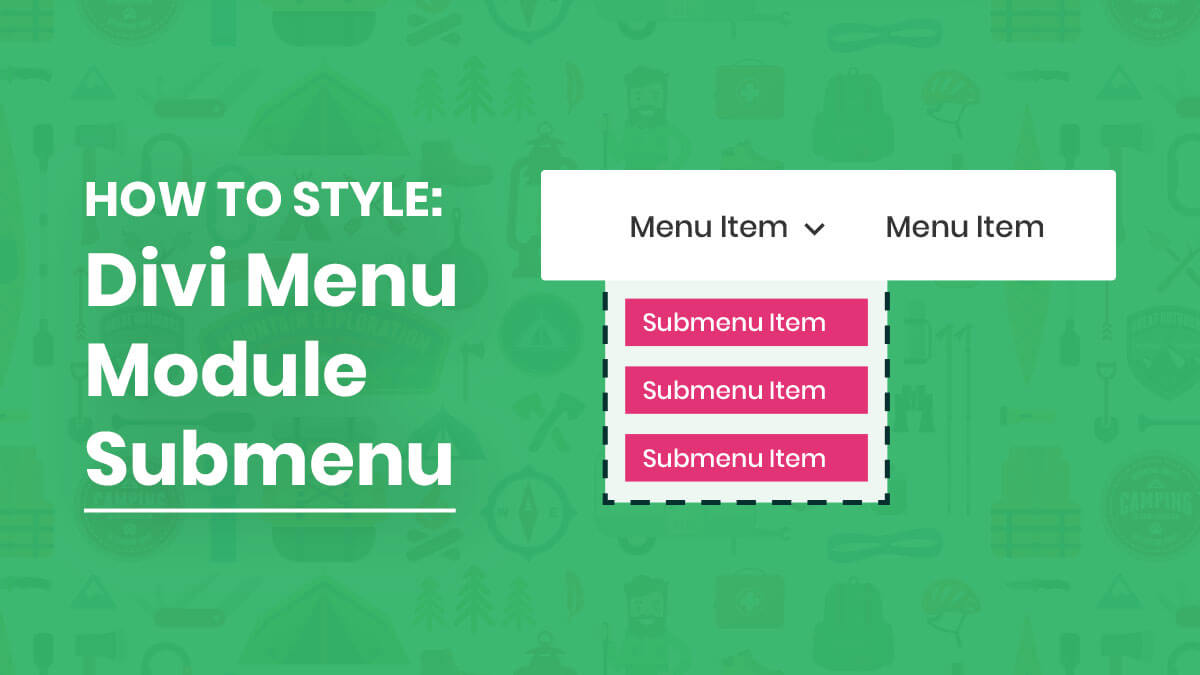
Adding Images To Divi Menus
We live in a visual world, and images are a big part of that. When createing websites, we all know how important images are to convey feeling, information, or add beauty. Why not add images to the Divi menu? This quick tutorial will show you how to add images to any Divi or WordPress menu.
Where and Why To Add Images To A Divi Menu
You can even add images to the main menu, but the submenu and mega menu would be the ideal places. You could even add an image that links to a product or blog post!
▶️ Please watch the video above to get all the exciting details! 👆
Add An Image To Your Divi Menu
From the WordPress dashboard, go to Appearance>Menus. Here you will either create a new menu or add an image to an existing one. Choose the menu you want to add the image to, and look for “Custom Links” in the list under “Add menu items.”

Next, add a hashtag # to the URL: field and click “Add to Menu.”

Arrange the custom link menu item under the main level menu item of your choice. Expand the menu item toggle. We are going to add the image to a custom link menu item using an HTML image code. Copy and paste the code snippet below into the Navigation Label field.
<img src="Insert Image URL Here" alt="Alternate Text" />
Now, be sure to click the blue save button on your menu. The last step is adding the correct image url to the code snippet. To do that, we need to go to the Media Library and either upload a new photo or use an existing one.
Select the image you want to add to your Divi menu, and this opens up the WordPress media settings. Look for the Copy Link at the bottom, and copy that url.

Now go back to your menu where you pasted the image HTML in the previous step. You need to replace the text that says “Insert Image URL Here” with the link you just copied.


NOTE: You can link this image to another page in two ways. Either add the url of the page to the URL field (shown in the image above) or you can choose to do this entire tutorial with a regular page link instead of a custom link.
Good job! You have added an image to your Divi menu.
Don’t forget to save your menu! Now go take a look!

Styling the Image In Your Divi Menu
At this point, the image is there and working. But you may want to adjust some of the styling. If you are using this as we showed in a submenu, then the best thing I can recommend is our tutorial on How To Style The Divi Menu Submenu Dropdown. That will get you a lot of ideas.
Add A CSS Class To The Image
Their are several ways we could target the image with CSS, but I want to make it as easy as possible for you. Go to your menu once again, and look up at the top corner of your screen fro something called “Screen Options.” Select that, and look for an option called “CSS Classes.” Make sure that is selected.

In the menu item that has the image, you will now see a new field called CSS Class (optional). Add a class to that. In my example, I used “pa-menu-image” to keep it simple.

Apply Some Custom CSS to The Image In Your Divi Menu
Now we can apply custom CSS styles to the image. There’s no right or wrong here, so just do what you need to achieve the desired look. Here are some suggestions.
/*add a rounded border to the image*/
.pa-menu-image img {
	border-radius: 10px;
}

/*remove padding around image*/
.pa-menu-image a {
	padding: 0!important;
}

/*remove semitransparent hover effect*/
.pa-menu-image a:hover {
	opacity: 1!important;
}
Using that code, it would now look like this:


29 Comments
Comments By Members
Comments By Others
Hi Sandy!
Please check the rendered size of the image using the browser inspector and resize the image to that size using paint or Photoshop.
Hope it helps!
Hi Kane!
Could you please share the URL for me to investigate further?
That would be far outside the scope of this tutorial 😉
Hi Jan,
Could you please share the URL for me to investigate further?
You’re welcome, it is so nice to hear that!
Results on mobile platforms with this type of code added to the menu item do not work reliably, depending on the size of the mobile platform. On smartphones, at least without a lot more trial and error, the image does not appear.
Hi Priyanka,
Hmm, this tutorial is actually standard WordPress, not specific to Divi, so it should work.
That’s great, so happy to hear this!
Hi there,
I’m not totally sure what you mean, so if you have a visual or example that would help anyone who can help here.
Hi Susan,
Did you apply a z-index to the images? Otherwise I”m not sure how you would have affected them.
You’re welcome!
Hi Tammy, that would be pretty easy with our mega menu tutorial: https://wordpress-292293-1617718.cloudwaysapps.com/how-to-create-a-divi-mega-menu/
Hi Curtis,
It sounds like you just need to be more specific, or in some cases use !important to override the default Divi styles. Feel free to look at our mega menu on this site, I think it is like you described.
Hi Traney,
It’s actually really easy, just grab the whole icon code from the Elegant Theme blog and replace the word “Home” with that in the menu item.