Subscribe On YouTube

Join other subscribers and enjoy other Divi video tutorials!

How To Add A Simple Corner Ribbon To Any Divi Module

Nelson Miller Profile Orange
This quick tutorial will show you how to add a simple corner ribbon to any Divi module directly in the module with some CSS!

▶️ Please watch the video above to get all the exciting details! 👆

Add A Corner Ribbon To Any Divi Module

So the idea here with this tutorial is to keep it simple, and avoid CSS classes and pasting snippets in Theme Options or your child theme. So I wanted you to be able to add a corner ribbon directly in the Divi Builder, to any Divi module, without span tags or custom classes, and it works great!

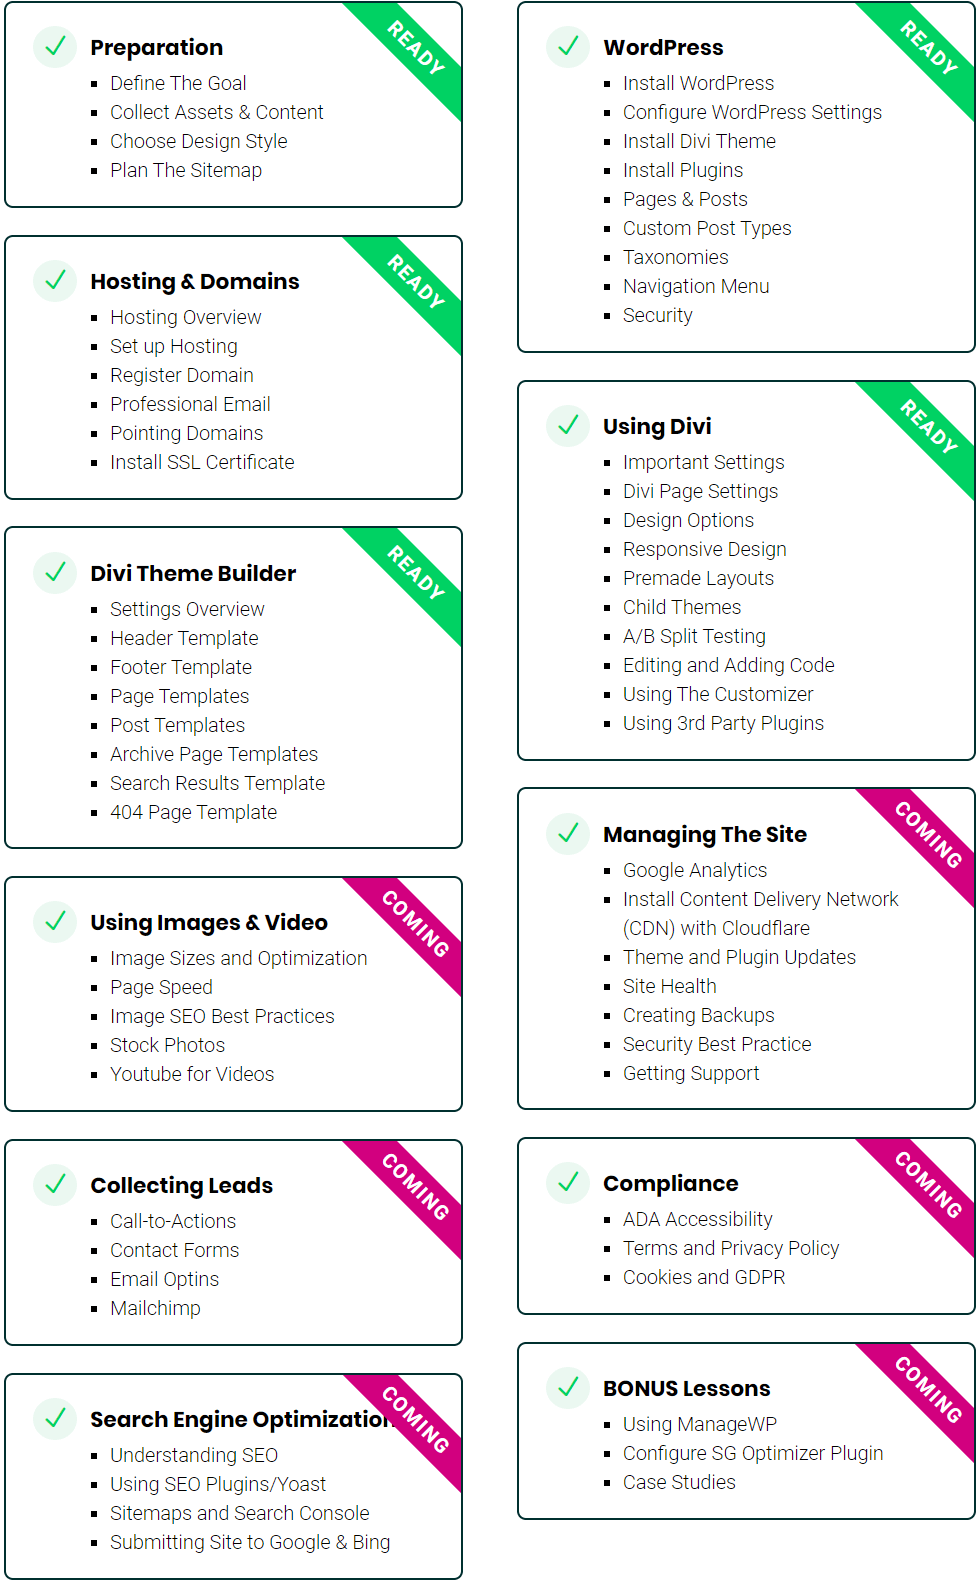
I added this to my Beyond The Builder website design course page. I wanted to indicate which lessons were ready now, and which ones were in progress. You can see the screenshot below of how it turned out:

Example of a CSS corner ribbon on a Divi Module Tutorial by Pee Aye Creative

You’ll notice I have two colors of ribbons, and that’s the beauty of this. You can customize each module’s ribbon color, text, size, etc.

Paste The CSS Code For The Corner Ribbon To Any Divi Module

Copy the CSS snippet below. Now go to the section, row, column, or module where you want to place the ribbon. Opent the settings and go to the Advanced tab. Open the Custom CSS toggle, and look for the “After” input area. That’s where you need to paste the snippet.

content: 'Ready';
position: absolute;
display: block;
right: -60px;
top: 30px;
width: 200px;
padding: 2px 10px;
background-color: #2cba6c;
color: #fff;
font-size: inherit;
font-weight: bold;
letter-spacing: 2px;
text-transform: uppercase;
text-align: center;
transform: rotate(45deg);
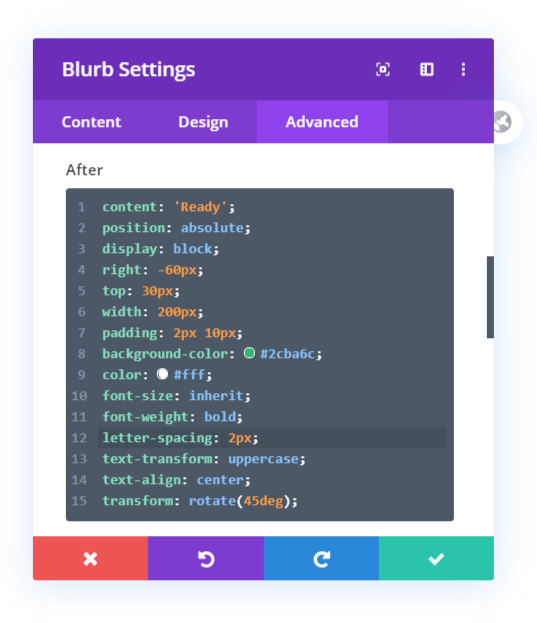
adding a corner ribbon to any Divi module

Customize The Corner Ribbon However You Want

Now, here’s where you will need to customize it. You can pretty much change anything here, and you probably will have to. If I change the text “Ready” to something longer, then it will either need a smaller font size or will need positioned differently. You can adjust the “right” and “top” values as well. And the padding, background color, literally anything. So play around with this, try to learn what each value is doing, and have fun! And that’s how you add a simple corner ribbon in Divi!

Subscribe For More Things Like This!

At the start of each month, we send out a recap newsletter from the month before with family news, Divi news, our latest tutorials, and product news. Occasionally, if the news is too exciting to wait, we will send out another email separate from the monthly newsletter. That’s what you get when you subscribe, and of course you can unsubscribe if you are no longer interested!

Blog Post Optin

Leave A Response!

By commenting you agree to our Blog & YouTube Comments Policy

24 Comments

Comments By Members

Comments By Others

  1. Nathan Furr

    Thanks for that tip! Worked like a charm.

    Reply
  2. Claudio

    sorry I was offline for several days and now the link with the code is not there any more. Can you paste it again? Thanks, Claudio

    Reply
  3. Claudio

    Thank you Hemant, for the explanation. Where and how should specify the link url?

    Reply
  4. Hemant Gaba

    Apologies for the confusion. Please go to the link given below and there you can see the whole code.
    http://pastie.org/p/1DWVAUgS8phH1vCoU1kEpf

    You need to place the link URL in the anchor tag inside href attribute quotes. Once you go to the link given above, you will understand.

    Please let us know if that helps. 🙂

    Reply
  5. Hemant Gaba

    If you want to add a link to the ribbon so the approach will change because currently, we are using the After pseudo-element which is technically not the real element that is why we can’t provide a link in that. To create a ribbon with the link first you need to go to the Module Settings > Advanced > CSS ID & Classes and place the Custom Class in the module on which you want to show the ribbon. Let’s say the custom class you have given is pa-module.
    After that, you need to place two snippets first is the jQuery and the second is the CSS.
    jQuery : Place this code in the Divi > Theme Options > Integrations > Head Panel

    jQuery(document).ready(function(){
    jQuery(“.pa-module”).append(“READY“);
    })

    CSS: Place this code in Divi > Theme Options > Custom CSS Panel

    .pa-module{
    position: relative;
    overflow: hidden;
    }
    a.pa-pseudo-link{
    position: absolute;
    display: block;
    width: 240px;
    padding: 2px 10px;
    background-color: #2cba6c;
    color: #fff;
    font-size: inherit;
    font-weight: bold;
    letter-spacing: 2px;
    text-transform: uppercase;
    text-align: center;
    transform: rotate(45deg);
    top: 2em;
    right: -2.7em;
    }

    You can change the top and right value for placing the ribbon as per your liking. Please let us know if that helps. 🙂

    Reply
  6. Gerardo

    Hi John, try typing “overflow: hidden;” in the “main element” input area.

    Reply
  7. Nathan Furr

    Hey John,
    I thought I was experiencing this issue as well. Once you save your blurb the boundaries should cut off the ribbon on the edges for you. Once I left the visual builder I saw that the effect works properly.

    Edit:
    I’m experiencing this issue as well. With a hover effect applied via the transform, I’m seeing the banner overlap in its default state and then it cuts off properly on the hover action.

    https://boatclass.com/basic-boatclass/

    Reply
  8. Nathan Furr

    I had to add a border to the blurb in order for it to properly cut off the banner at the edges.

    Reply
  9. Nelson Lee Miller (aka The Divi Teacher) <span class="comment-author-role-label author-label">Author</span>

    Hi Ernst,
    So that’s actually asking the wrong question. I think you mean how to make the category meta in the blog module into a ribbon. I do plan to have a tutorial on highlighting the category, but not sure about making it a ribbon, but I’ll try to include that.

    Reply

Leave a Reply to Nelson Lee Miller (aka The Divi Teacher) Author Cancel reply

Your email address will not be published. Required fields are marked *

Recent Posts

0

Your Cart